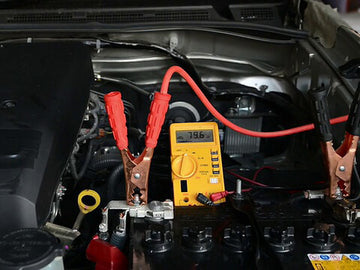
Knowing how to jump-start a car using jumper cables can be a lifesaver in unexpected situations, especially when dealing with a dead battery and no specialized equipment. By following the right steps and taking necessary precautions, you can quickly and safely get a vehicle back on the road. This guide will walk you through the process, from identifying battery terminals to connecting the jumper cables and starting both vehicles. It’s essential to prioritize safety by wearing appropriate gear and adhering to all precautions during the procedure. With this knowledge, you’ll be well-prepared to handle any battery-related emergencies that come your way.
What tools do you need for jump starting with wires?
When jump-starting a car with wires, having the right tools is crucial for a safe and effective process. Here's what you'll need:
Jumper Cables: Ensure they are in good condition, without any exposed wires or damage.
Another Vehicle: You'll need a running vehicle with a charged battery to provide the jump-start.
Protective Gear: Wear safety glasses and gloves to protect yourself from any sparks or electrical issues.
Wire Brush or Cloth: To clean any corrosion or debris from the battery terminals.
Owner's Manual: Always refer to the car's owner's manual for specific instructions and precautions.
Having these tools on hand ensures that you can address a dead battery situation promptly and safely. Before attempting a jump start, make sure both vehicles are in a safe location, and follow the correct sequence of steps to avoid any mishaps. Remember, safety should always be the top priority during such procedures.

How to jump a starter with wires?
Jump-starting a vehicle with wires is a practical skill every driver should know. Here's a comprehensive guide on how to boost a car successfully using jumper cables:
Identifying the Positive and Negative Terminals:
Begin by identifying the positive (+) and negative (-) terminals on both the dead and booster vehicle batteries. These are usually marked with red and black indicators. Inspect the batteries for any signs of damage or corrosion.
Connecting the Jumper Cables:
Red Cable (Positive Terminal): Connect one end of the red jumper cable to the positive terminal of the dead vehicle's battery.
Red Cable (Positive Terminal): Attach the other end of the red cable to the positive terminal of the booster vehicle's battery.
Black Cable (Negative Terminal): Connect one end of the black jumper cable to the negative terminal of the booster vehicle's battery.
Black Cable (Ground Point): Instead of connecting the other end of the black cable to the negative terminal of the dead battery (which can produce sparks), find an unpainted metal surface in the dead vehicle's engine bay and secure the cable there.
Connecting the Other End to a Power Source:
Start with the booster vehicle off. Connect the other end of the red cable to the booster vehicle's positive terminal and the black cable to the chosen grounding point. Ensure a secure connection.
Starting the Booster Vehicle:
Start the booster vehicle and let it run for a few minutes. This allows the electrical system to transfer charge to the dead battery.
Starting the Dead Vehicle:
Attempt to start the dead vehicle. If it doesn't start, wait a few more minutes and try again. Once the dead vehicle is running, keep both engines on for a while to allow the alternator to charge the previously dead battery.

Safety Tips:
Prevent Sparks: Always connect the cables in the specified order to avoid sparks near the battery.
Caution with Hybrid Vehicles: Exercise extra caution when boosting hybrid vehicles; consult the vehicle's manual if uncertain.
Professional Help: If the dead vehicle doesn't start after several attempts, seek professional assistance.
Mastering the art of boosting a car with wires ensures you can confidently handle unexpected battery issues and help others in need. Traditional jumper cables, while effective, require attention to detail in identifying positive and negative terminals, connecting cables, and starting vehicles in the correct sequence. By understanding these steps and practicing safety precautions, you contribute to a smoother jump-start process. Remember to seek professional help if uncertain. Preparedness is essential, and the ability to jump-start a car with wires is a valuable skill for any driver.
Considerations for Using a Portable Jump Starter:
While traditional jumper cables are effective, modern portable jump starter packs offer a convenient alternative. If you're considering this option, here are key aspects to keep in mind:
Understanding the Portable Jump Starter:
Power Output: Portable car jump starter packs come with varying power outputs measured in peak cranking amps (PCA). Ensure the pack has sufficient power for your vehicle's engine size.
Battery Capacity: Higher-capacity batteries generally result in faster charging times and increased effectiveness.
Additional Features: Look for features such as multiple USB charging options, built-in emergency LED functions (flashlight, SOS, strobe), and reverse polarity protection.
Procedure for Boosting a Car with a Portable Jump Starter Pack:
Charge the Portable Pack: Ensure the car battery booster pack is adequately charged before use.
Connect the Cables: Follow the manufacturer's instructions for connecting the positive and negative cables to the corresponding terminals on the pack and the vehicle's battery.
Start the Vehicle: Once connected, attempt to start the vehicle. Portable car jump starters often have safety features to prevent sparking.
Advantages of Portable Jump Starter:
Portability: Compact and lightweight, these packs are easy to carry in the vehicle.
Independence: No need for an external power source; the pack contains its own power for jump-starting.
Multi-functional: Beyond jump-starting, many packs serve as power banks for electronic devices and include emergency lighting features.
Ultimately, whether using traditional jumper cables or a portable jump starter pack, knowing how to boost a car is an invaluable skill for any driver. Regularly check the condition of your chosen method and ensure it's well-maintained for reliable performance in emergency situations. Always prioritize safety by following manufacturer guidelines and exercising caution during the boosting process.

Tips on what to avoid and potential risks during the entire jump starting process
Jump-starting a car is a valuable skill, but it comes with its set of challenges and potential risks. Here are essential tips to ensure a smooth process while avoiding common pitfalls:
To start, always connect the jumper cables in the correct order – positive to positive and negative to negative – to prevent sparks and ensure a safe jump start. Reversing the cable connections can result in sparks, damage to the electrical systems, and even battery explosions.
Additionally, place the jumper cables in areas away from moving engine parts and extreme heat sources. Placing cables near moving components like belts or in direct contact with hot engine surfaces can lead to damage, melting, or fire hazards.
Limit each attempt to start the engine to about 10-15 seconds and allow a rest period between attempts to prevent overheating. Prolonged cranking can overheat the starter motor and lead to damage or failure.
Avoid jump-starting a vehicle with a frozen battery. If the battery is frozen, it should be thawed before attempting a jump start, as jump start a frozen battery can cause it to leak, crack, or even explode.
When using jumper cables, choose a suitable grounding point away from the dead battery to prevent sparks near the potentially explosive hydrogen gas emitted by the battery. Connecting the negative cable directly to the dead battery can lead to sparks, creating a hazardous situation.
Inspect the jumper cables for any visible damage, such as exposed wires or fraying, before use. Damaged cables can pose safety hazards, including electrical shocks, short circuits, and fires.
Take extra care to avoid reversing the polarity when connecting jumper cables, as it can damage the vehicle's electrical system. Reversing the polarity may cause electrical system failures, damage to sensitive electronics, and other serious issues.
If uncertain or unsuccessful after a few attempts, seek professional assistance rather than persisting with potentially risky methods. Incorrect attempts to jump-start a vehicle may lead to further damage, and professional help can ensure a safe resolution.
By adhering to these tips and avoiding potential risks, you can confidently and safely navigate the jump-starting process, ensuring the efficient revival of a dead car battery. Always prioritize safety, and when in doubt, consult professional assistance.
Navigating Car Troubles Safely: Recap and the Convenience of Portable Jump Starters
Recapping the process of jump-starting a car with wires involves identifying terminals, connecting jumper cables, and starting the booster vehicle. While these steps can be effective, the process might be complex for some. If you find jump-starting with cables challenging, there's an alternative solution – the Amproad iRock 40 portable jump starter.
With a robust 4,000 peak cranking amps, the Amproad iRock 40 is a powerful and user-friendly tool. Instead of grappling with cables and relying on another vehicle, you can conveniently and safely jump-start your car with this compact device.
While, jump-starting a car demands precision, and if you're unsure or uncomfortable with the process, seeking professional help is a prudent choice. A professional can ensure a safe and accurate jump-start without the risk of errors.
For those who prefer a simpler and more straightforward solution, having a portable jump starter, like the Amproad iRock 40, is a smart investment. These devices offer a reliable and convenient alternative to traditional jump-starting methods, ensuring you're prepared for unexpected battery issues without the complexity of using cables.


